Click on the "Virtual Libraries" menu to get a list of the currently configured VTLs as shown in the figure below

Click on the "View" link to view the configuration of a specific VTL
Click on the "Add VTL" button to add a new VTL. A form is displayed as shown in the figure below
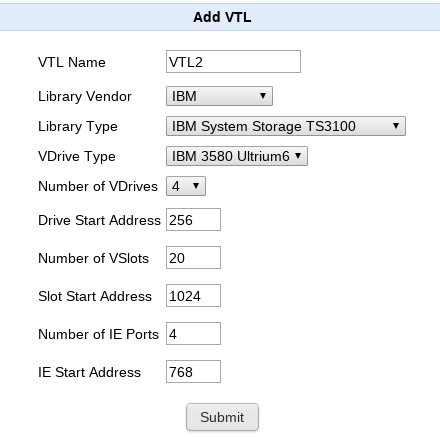
In the above form
- VTL Name is the name of the VTL. A valid name can only contain alphabets and numbers
- Library Type is the type of tape library to emulate. Changing the Library Vendor will display the libraries emulated for the vendor
- VDrive Type is the type of tape drives to emulate. Currently a VTL can only have a single type of tape drive emulation. (Mixed mode libraries are not supported)
- Number of VDrives specify the number of tape drives to emulate
- Number of VSlots specify the number of storage slots to emulate. The maximum number of storage slots is 60000 per VTL
- Number of IE Ports specify the number of changer access ports to emulate. This can be between 0 to 200
- Drive Start Address specifies the starting element address to report for the tape drives. Similarly for the storage slots the Slot Start Address and for the I/E port the IE Start Address.
Click on submit.
In the next page as shown below you will be able to add additional virtual drives.

Click on the "Add VDrives(s)" button to add additional virtual drives. These drives can be of a different type as shown in the figure below
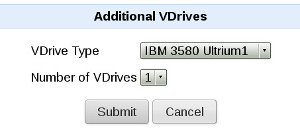
Click on "Submit" to take you back to the "Add VTL" configuration page. If you wish to cancel adding additional drives click on Cancel.
Click on the "Add VTL" button to create the VTL configuration
On a successful addition the VTL configuration of the newly added VTL is displayed as shown in the figure below
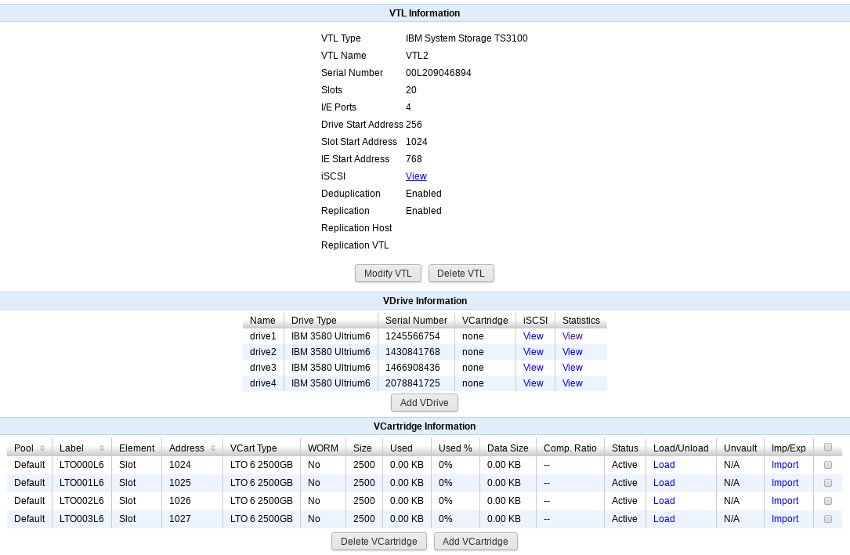
To delete a VTL click on "Virtual Libraries" and then "View" for that VTL and then click on the "Delete VTL" button
Modifying a VTL configuration
Click on "Modify VTL" to modify a VTL configuration. A form is displayed as shown in the figure below
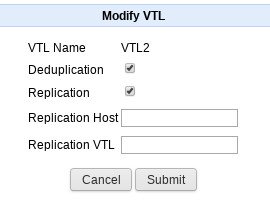
Replication Host is the IPv4 address of a remote VTL system. When this property is set, auto-replication is enabled for this VTL instance and when a vcartridge is unmounted or moved into an import/export port a replication job is queued for the vcartridge
Replication VTL is the name of the VTL on the remote VTL instance. If this value is not specified, the replication is done to a VTL with the same name. If the remote VTL instance does not exist, a VTL with similar properties as the source VTL is created
Replication is enabled for a VTL by default. Auto-replication job for a vcartridge is started only when replication is enabled for the VTL.
Deduplication is enabled for a VTL by default. This can be disabled by unselecting the "Deduplication" checkbox. For vcartridges in non-deduplication storage pool changing this value for the VTL has no effect.
Click on Submit for modifying the VTL properties and click on Cancel to go back to the VTL configuration page
Configuring virtual cartridges
To add a vcartridge click on the "Add VCartrige" button. A form is displayed as shown in the figure below
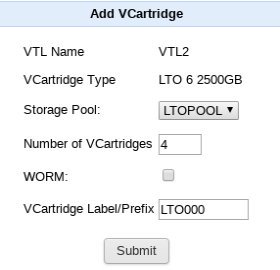
Select the storage pool to which the vcartridge(s) will belong. Specify the number of vcartridges to create. Select WORM if WORM property needs to be enabled for the vcartridges created
If the number of vcartridges is greater than one then the label will be of the following format
LTO000
AAA000
If for example the number of vcartridges is 2 then the labels for the newly created cartridges will be LTO000L6, LTO001L6 etc. If WORM were selected then the labels for the newly created cartridges for our example will be LTO000LU, LTO0001LU etc.
If the number of vcartridges is one then the label can be any length upto 32 characters.
Only alphabets a-z, A-Z and numbers 0-9 are accepted for a label/prefix
Click on Submit to add the specified number of vcartridges. The specified number of vcartridges will be created as shown below

The description of the columns shown are as below
- Pool: The storage pool of the vcartridge
- Label: The vcartridge barcode label
- Element: The library element the vcartridge is currently in. This is "unknown" if the vcartridge has been exported out of the ibrary
- Address: The library element address of the vcartridge
- WORM: Yes indicates that the vcartridge is a Write Once Read Many (WORM) vcartridge. Overwrites to existing data is not allowed
- Size: The capacity of the vcartridge in GB
- Used: The capacity of the vcartridge used. The actual physical space used by the vcartridge can be lower than this because of deduplication. This value represents the capacity of tape that would have been utilized when there is no deduplication
- Data Size: The size of data received from a host and written to the vcartridge.
- Status: Status can have the following values
- Active: The vcartridge is active in one of the tape library elements and can be data can be written to it or read from it
- Vaulted: The vcartridge has been moved to a virtual vault outside the VTL instance. An inventory of the VTL will no longer report the vcartridge as a part of the library. The vcartridge can be unvaulted by clicking on the "Unvault" link that will be shown in the "Unvault" column
- Load Error: There was a problem in loading back the vcartridge metadata from disk
- Replication Pending: Replication for the vcartridge is pending or in progress
- Export Pending: Tape export for the vcartridge is pending or in progress
- Load/Unload: The "Load" link can be used to select the drive to mount the vcartridge. If a vcartridge is mounted an "Unload" link is shown instead and this link can be used to unmount the vcartridge
- To delete a vcartridge select the vcartridge in the checkbox on the right and click on "Delete VCartridge" button. Up to 64 vcartridges can be selected and deleted at a time.
Custom VCartridge size
Depending on the type of vcartridge that is to be created, the size of the vcartridge is determined. For example a LTO 1 vcartridge will have have a size of 100 GB. It should be noted that space for vcartridge is only allocated when needed in 64 MB chunks. This behavior can be changed by specifying a MaxVCartSize in /quadstorvtl/etc/quadstor.conf.
For example the following line in /quadstorvtl/etc/quadstor.conf will create new vcartridges with size of 8 GB
MaxVCartSize=8
The MaxVCartSize can range from 1 to 1600. If MaxVCartSize is specified it takes precedence over the predetermined size based on the vcartridge type. MaxVCartSize is checked for before creating a vcartridge. Therefore there is no need to restart the quadstor service after adding/modifying this value
NOTE: A backup application may estimate the available capacity based on the cartridge type.
VCartridge Locations
In the figure shown above there are two columns "Element" and "Address" which describe the location of a VCartridge in the VTL
"Import/Export" under the "Element" column indicates that the VCartridge is placed in a "Import/Export" element (mail slot)
"Slot" indicates that the VCartridge is placed in a storage slot and "Drive" will indicate that it is placed in a tape drive
By default a new VCartridge is placed in a free storage slots. If there are no empty storage slots then it is placed in a free import/export element. This behavior can be changed to first add a new VCartridge into any available import/export element first by adding the following line to /quadstorvtl/etc/quadstor.conf
UseFreeSlot=0
A quadstorvtl service restart is not required when changing the above property. Each time a VCartridge is added the value of this property is checked
Exporting a VCartridge
1. In the backup application move the VCartridge to a free Import/Export element
The VCartridge is removed from the active list of vcartriges for the VTL and is moved to a virtual vault. An inventory of the VTL by the application will no longer list the VCartridge. The status of the vcartridge will show as "Vaulted"
Unvaulting an exported VCartridge
Once a VCartridge has been exported, to move into back into the VTL, click on the "Unvault" link. Unvaulting a vcartridge will fail if there are no available free storage or import/export slots
Command line configuration
Display VTL emulation type codes
Every medium changer device and tape drive emulated has a type code assigned by the system. /quadstorvtl/bin/vtconfig –h displays the type code assigned and is as shown below
Library Types
Type Description
01 ADIC Scalar 24
02 ADIC Scalar 100
03 ADIC Scalar i2000
04 HP StorageWorks ESL9000
05 HP StorageWorks ESL E-Series
06 HP StorageWorks EML E-Series
07 IBM 3583 Ultrium Scalable Library
08 IBM 3584 Ultra Scalable Library
09 IBM System Storage TS3100
10 HP StorageWorks MSL 2024/4048/8096
11 HP StorageWorks MSL 6000
12 Overland NEO 2000/4000/8000 Series
13 StorageTek L20 Library
14 StorageTek L40 Library
15 StorageTek L80 Library
16 StorageTek L120 Library
17 StorageTek L180 Library
18 StorageTek L700 Library
19 StorageTek L1400/700e Library
20 StorageTek SL150 Modular Library
21 StorageTek SL500 Modular Library
22 StorageTek SL3000 Modular Library
23 StorageTek SL8500 Modular Library
24 SpectraLogic 2K/TreeFrog Library
25 SpectraLogic 12/20/64K Library
26 SpectraLogic T24 Library
27 SpectraLogic T-Series Library
28 Quantum/ADIC Scalar 50
29 Quantum/ADIC Scalar i40/80 Series
30 Quantum/ADIC Scalar i500
31 Quantum/ADIC Scalar i6000
32 ATL M1500
33 ATL M2500
34 ATL P1000
35 ATL P2000
36 ATL P3000
37 ATL P4000
38 ATL P7000
39 Quantum PX500 Series
40 Quantum PX720
Drive Types
Type Description
01 HP StorageWorks DLT VS80
02 HP StorageWorks DLT VS160
03 HP StorageWorks SDLT 220
04 HP StorageWorks SDLT 320
05 HP StorageWorks SDLT 600
06 Quantum SDLT 220
07 Quantum SDLT 320
08 Quantum SDLT 600
09 HP StorageWorks Ultrium 232
10 HP StorageWorks Ultrium 448
11 HP StorageWorks Ultrium 460
12 HP StorageWorks Ultrium 960
13 HP StorageWorks Ultrium 1840
14 HP StoreEver Ultrium 3280
15 HP StoreEver Ultrium 6250
16 IBM 3580 Ultrium1
17 IBM 3580 Ultrium2
18 IBM 3580 Ultrium3
19 IBM 3580 Ultrium4
20 IBM 3580 Ultrium5
21 IBM 3580 Ultrium6
22 StorageTek T9840A
23 StorageTek T9840B
24 StorageTek T9840C
25 StorageTek T9840D
26 StorageTek T9940A
27 StorageTek T9940B
28 StorageTek T10000A
29 StorageTek T10000B
30 StorageTek T10000C
31 Quantum DLT VS80
32 Quantum DLT VS160
Adding a VTL
/quadstorvtl/bin/vtconfig -a -v <vtl name> -t <type> -s <number of slots> -i <number of ie ports> -d <drive type> -c <drive count> -d <drive type> -e <drive start address> -f <slot start address>
In the above command type and drive type will be the library and drive type codes. Slot count is optional and if slot count is zero or not specified, the system will calculate the number of slots based on the drive type and the available space in the storage pool. The default drive start address of 1 and slot start address of 2 will be used if these values are not specified.
Deleting a VTL
/quadstorvtl/bin/vtconfig –x –v <vtl name>
Enabling deduplication
/quadstorvtl/bin/vtconfig -m -v <vtl name> -e 1
Disabling deduplication
/quadstorvtl/bin/vtconfig -m -v <vtl name> -e 0
Vcartridge Configuration
Vcartridge emulation type codes
/quadstorvtl/bin/vcconfig –h
Type Description
03      DLT IV 40GB
04      VSTape 80GB
05      SuperDLT I 110GB
06      SuperDLT I 160GB
07      SuperDLT II 320GB
08      LTO 1 100GB
09      LTO 2 200GB
10      LTO 3 400GB
11      LTO 4 800GB
12      LTO 5 1500GB
13      LTO 6 2500GB
14      LTO 7 6000GB
15      T9840A 20GB
16      T9840B 20GB
17      T9840C 40GB
18      T9840D 75GB
19      T9940A 60GB
20      T9940B 200GB
21      T10000A 500GB
22      T10000A 1000GB
23      T10000C 5000GB
24      T10000D 8500GB
26      LTO 8 12000GB
Adding a vcartridge
/quadstorvtl/bin/vcconfig -a -v <vtl name> -g <pool name> -p <label/prefix> -t <vcartridge type> -c <count>
Deleting a vcartridge
/quadstorvtl/bin/vcconfig -x -v <vtl name> -p <label>
Enable WORM
/quadstorvtl/bin/vcconfig -v <vtl name> -p <label> -w 1
Disable WORM
/quadstorvtl/bin/vcconfig -v <vtl name> -p <label> -w 0
Unvault a vcartridge
/quadstorvtl/bin/vcconfig -v <vtl name> -p <label> -p  -u
Or
/quadstorvtl/bin/vcconfig --vtl=<vtl name> --label=<label> --unvault
Load (mount) a vcartridge
/quadstorvtl/bin/vcconfig --vtl=<vtl name> --label=<label>  --driveid<vtl drive id> --loaddrive=1
Each VTL drive is assigned an ID starting from 1
Unload (unmount) a vcartridge
/quadstorvtl/bin/vcconfig --vtl=<vtl name> --label=<label> --driveid<vtl drive id> --loaddrive=0
